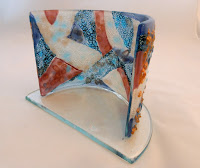
Hand-Painted Fused Glass Candle Shield
 |
| Fused glass candle shield |
These manufacturers have been forced to stop producing a significant amount of their colored glass. When glass artists ask, "How can we help?" one answer is to support these manufacturers by buying, and creating with, the manufacturers' clear glass. With this in mind, I am offering this tutorial -- a fused glass candle shield that uses clear glass, glass paints, and mica powder.
Materials
 |
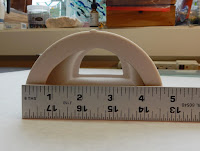
| Colour de Verre's lamp panel former |
- Lamp bender mold, I used Colour de Verre's round lamp panel former
- Two 8.5x4.25" pieces of clear glass (or other size to fit your mold)
- Two ~8x5" pieces of clear glass
- Unique Glass Color (UGC) Artisan paints in White Glo and Mystic Blue
- UGG Medium
- Colors for Earth (CFE) glass paints in Deep Cranberry and Sapphire Blue
- CFE Medium
- Sepp Aztec Gold Mica
- Fuse Master Super Spray
- Coarse Clear Frit
- Sky Blue Coarse Frit (optional)
- E6000 or your favorite glass glue
Directions
 |
| Instructions for mica-coated frit |
Pour some of the clear coarse frit in a small container and mix with Super Spray. You want enough liquid to wet the frit, but you don't want it dripping.
Sprinkle a small amount of mica powder in the container and mix well.
Pour the mica-covered frit onto a paper towel and set aside to dry.
 |
| Measure the mold to determine the size of glass |
Use a tape measure to measure the size of glass for the mold. This mold is approximately 8.5" from one side, across the arc, and to the other side. I decided to cut my two pieces of glass for the candle shield to 8.5"x4.25".
 |
| Measure the base of the mold |
Measure the bottom edge of the mold to determine the size of the candle shield base. This mold measures 4.5 inches, so I decided to make the width of my candle base 6.5".
 |
| Draw a template for the candle base |
Draw a template for the base of the candle shield. I find it useful to use graph paper. I used a compass to draw the arc for the shield, though you could also place the mold itself on the paper and use a ruler to draw marks approximately 0.75" around the mold (much like marking the sewing lines for a fabric pattern). Use this pattern for cutting out the two base pieces of glass. You can place your glass on top of the pattern and score the glass.
 |
| Plan your painted design |
Even though I will be applying the paints in a freeform pattern, I like to draw out a general design. Again, the graph paper comes in handy.
Once you've drawn your design, place one of your candle shield rectangles on top of the pattern. Mix your paints as recommended by the manufacturers and begin painting.
 |
| Painted glass set aside to dry |
Set aside the painted panel and let it dry completely.
 |
| Cap the painted piece with clear and decorate with frit |
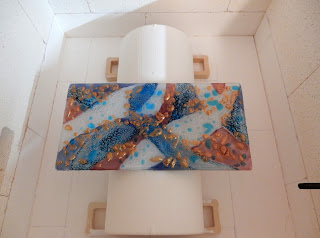
When the painted panel is dry, top it with the second sheet of clear. Sprinkle on the mica-coated clear frit. Don't cover the painted design completely; otherwise, you may hide the lovely bubbles you'll get from the Artisan paints. If you choose, add some additional colored frit. I've used a little sky blue coarse frit.
 |
| Placed on Papyrus and ready for the first firing (I hate empty space in the kiln -- I snuck in another piece!) |
|
Seg
|
Rate
|
Target
|
Soak
|
|
|
1
|
300
|
1100
|
15
|
|
|
2
|
300
|
1420
|
10
|
|
|
3
|
1500
|
950
|
75
|
|
|
4
|
100
|
700
|
00
|
 |
| After the first fuse |
Once the first fuse is complete, you are ready to slump on the lamp mold. Center the piece on the mold and fire. I used the following schedule:
 |
| Centered on the mold for the slump |
|
Seg
|
Rate
|
Target
|
Soak
|
|
|
1
|
250
|
1100
|
30
|
|
|
2
|
250
|
1225
|
20*
|
|
|
3
|
1500
|
950
|
75
|
|
|
4
|
100
|
700
|
00
|
*Watch your slump and adjust the hold time accordingly.
 |
| Candle base after grinding & hand- polishing the edges |
If you would like, use a regular table-top grinder to cold-work the edges of the candle base. Start with a coarse grinder head and shape all edges of the base. Now, switch to a fine grinder head and go over what you shaped. Finally, if you have diamond hand-pads available, use them to further refine the edges. Start with the lowest number grit (coarse) and work your way to the highest number grit you have available.
Notice from the picture that the edge of the base was smooth enough, that if I would have liked, I could have used it as it was. However, I decided to do a final fire polish, using the following schedule:
|
Seg
|
Rate
|
Target
|
Soak
|
|
|
1
|
250
|
1100
|
30
|
|
|
2
|
250
|
1350
|
5
|
|
|
3
|
1500
|
950
|
60
|
|
|
4
|
100
|
700
|
00
|
The bottom edge of my candle shield was very even and sat level on the base when I tested it, so I did not need to cold-work it further after fire-polishing. You may find you need to grind the bottom, so the shield sits nicely on the base. If you have taken care during the slump to place the glass evenly on the mold, minimal leveling of the base will be required.
 |
| Back of the candle shield |
To complete the candle shield, run a bead of E6000 or other glass glue along the bottom edge of the shield and set it in place on the base. Follow the glue manufacturer's directions for curing the glue -- E6000 should be left undisturbed at least 24 hours.
 |
| Close-up of paints and mica frit |
Using paints and mica is a great way to turn a piece of clear glass into a colorful work of art. The ideas in this tutorial can be used with whatever type of clear glass you have available -- whether it is Bullseye, Uroboros, Spectrum, Wissmach, or even float glass.
I hope this information will inspire you to pull out your paints and micas and get creative with clear glass while supporting our art glass manufacturers!
Happy fusing, Dana
 |
| Finished candle shield sits in a window |
 |
| Candle shield with candle |
Fused Glass Learning Resources
Want to learn more about fused glass? Check out Bullseye Glass's On-Line educational videos by clicking the banner below:


