Art Glass Poppies!
 |
| Orange fused glass poppy |
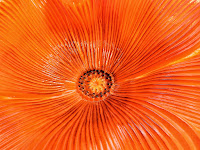
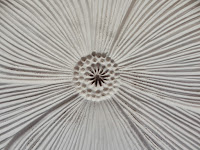
This year I picked up a Large Poppy mold (LF113). Creative Paradise has a couple of great tutorials on their site for casting into the mold and for using various sizes of frit in the mold (see link below). However, I wanted to see what effects I could achieve using powders and sheet glass. Following is a short tutorial on how I created poppies using powders and sheet glass.
 |
| Yellow-orange poppy |
Tutorial
Begin by treating the mold with MR-97. I use a 1.5" paintbrush to brush out the mold, and then give the mold a couple of quick sprays with MR-97. (Color de Verre has good information on their web site about coating molds with MR-97, see link below.) Do not overspray the mold -- too much MR-97 may be hard to remove or dull the finished piece.
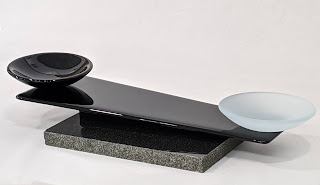
After the mold has dried at least 15 minutes, begin filling the mold with powders. I like to place molds I am working on, on short 1/2" kiln posts so that it's easier to pick up the mold later without tipping it. For the yellow-orange poppy (shown in a stand on the right), I put down powder as detailed below. Note that all powders listed were System 96 opals.
Fill the center with a small amount of black powder, and use a little black powder in the ribs of the poppy for shading. Use the black very sparingly -- too much can overwhelm the other colors.
Cover the black powder in the flower center with white.

Sift some marigold over the center, and then sift marigold along the sides of some of the petals for shading.
Put down some orange for more shading.
Now sift down yellow on some of the petals, and add white on some edges for highlights.
Cover the entire area with sunflower powder. Try to get sufficient coverage so that when the piece is fired, you have a good solid background of color.
Use a small paintbrush to clean the over-sifted powder from the edges of the mold, and top the mold with two 10.25" circles of clear glass.
The glass should be just large enough so that it rests on the top edges of the mold. It should not fit down inside the mold, as doing so will be more likely to trap air and cause bubbles.
Note that both of these kilns are firebrick and cool quite slowly. Firing time was 13.5 hours, and then I let the kilns cool normally to room temperature (several more hours). Notice the long hold for the bubble squeeze (ramp 2).
Here's the yellow-orange poppy after firing (also pictured in stand, above).
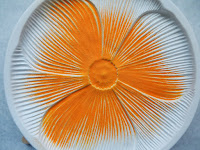
Here is the powder layout for the orange poppy shown completed at the top of this post. Colors include black, yellow, plum, red, marigold, and orange:
This is after firing, before slumping.
The orange poppy was slumped into this mold:
Here is a bright yellow poppy. The powders used were white for the center, orange for coloring the veins near the center, and topped with yellow powder.
When choosing powders for any project, keep in mind that sulfur-bearing glasses (reds, yellows, oranges) will react with copper-bearing glasses (blues, greens). The reaction can produce murky, undesirable results. If you want to use copper- and sulfur-bearing glasses in the same project, make sure they are separated from each other with a non-reactive glass (white, clear, and celadon are a few). See Resources below for another blog post on reactions and working with powders.
I hope you have found this information useful, and can use some of the ideas in your own work with either Creative Paradise's Large Poppy mold, or another mold of your own.
Thanks for reading!
Dana
Want to learn more about fusing? Bullseye Glass offers educational videos for a small annual subscription fee (click the banner below):


After the mold has dried at least 15 minutes, begin filling the mold with powders. I like to place molds I am working on, on short 1/2" kiln posts so that it's easier to pick up the mold later without tipping it. For the yellow-orange poppy (shown in a stand on the right), I put down powder as detailed below. Note that all powders listed were System 96 opals.
Fill the center with a small amount of black powder, and use a little black powder in the ribs of the poppy for shading. Use the black very sparingly -- too much can overwhelm the other colors.
Cover the black powder in the flower center with white.

Sift some marigold over the center, and then sift marigold along the sides of some of the petals for shading.
Put down some orange for more shading.
Now sift down yellow on some of the petals, and add white on some edges for highlights.
Cover the entire area with sunflower powder. Try to get sufficient coverage so that when the piece is fired, you have a good solid background of color.
Use a small paintbrush to clean the over-sifted powder from the edges of the mold, and top the mold with two 10.25" circles of clear glass.
The glass should be just large enough so that it rests on the top edges of the mold. It should not fit down inside the mold, as doing so will be more likely to trap air and cause bubbles.
Firing Schedule
I tested this firing schedule in two of my kilns, a Skutt GM1414 and a Paragon Fusion 14, with consistent results in each. However, you may need to adjust the schedule for your particular kiln or if you use 90 COE glass.
Segment
|
Rate
|
Target
|
Hold
|
Ramp 1
|
300
|
1100
|
30
|
Ramp 2
|
50
|
1250
|
60
|
Ramp 3
|
500
|
1460
|
15
|
Ramp 4
|
1500
|
950
|
90
|
Ramp 5
|
100
|
700
|
00
|
Note that both of these kilns are firebrick and cool quite slowly. Firing time was 13.5 hours, and then I let the kilns cool normally to room temperature (several more hours). Notice the long hold for the bubble squeeze (ramp 2).
Here's the yellow-orange poppy after firing (also pictured in stand, above).
 |
| Yellow-orange poppy |
 |
| Close-up, yellow-orange poppy |
Here is the powder layout for the orange poppy shown completed at the top of this post. Colors include black, yellow, plum, red, marigold, and orange:
 |
| Powder layout, orange poppy. |
 |
| Covered with orange powder. Clear glass on mold edges. |
This is after firing, before slumping.
 |
| Orange poppy before slumping |
 |
| Close-up, orange poppy |
The orange poppy was slumped into this mold:
 |
| Slumping mold |
Here is a bright yellow poppy. The powders used were white for the center, orange for coloring the veins near the center, and topped with yellow powder.
 |
| Bright yellow poppy |
 |
| Close-up, bright yellow poppy |
Bubbles
There is always a concern when using full sheets of glass with a fusing mold. There are two factors that minimize the bubbles in the fired poppies. First, the glass blanks were placed on the edge of the casting mold, not directly on the powder. Second, I used a slow, long bubble squeeze in the firing schedule. Both of these result in the center of the glass falling onto the powder first, which allows the air to be squeezed out as the glass levels into the mold from the center to the outside edges. While the poppies do have some small bubbles, they are on the backside of the glass and do not detract from the finished project (in my opinion). Here are pictures of the bubbles in both the yellow-orange and orange poppies.
 |
| Back of yellow-orange poppy |
 |
| Back of orange poppy |
I hope you have found this information useful, and can use some of the ideas in your own work with either Creative Paradise's Large Poppy mold, or another mold of your own.
Thanks for reading!
Dana
Resources
- Creative Paradise web site: https://creativeparadise.biz/
- Creative Paradise Tutorials: https://creativeparadise.biz/glass/tutorialsvideos
- Color de Verre, information on using MR-97: http://www.colourdeverre.com/learn.php
- Blog, Working with Powders: http://jestersbaubles.blogspot.com/2015/03/studio-tip-powdered-frit.html
Want to learn more about fusing? Bullseye Glass offers educational videos for a small annual subscription fee (click the banner below):


