Bubble Squeeze Firing Schedule for Fused Glass
 |
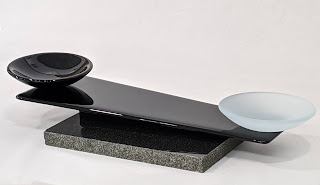
| Invisibility, Dana Worley 2020 With this piece it was important that the black glass be perfectly smooth |
When fusing together two pieces of glass larger than 3 to 5 inches, the two layers of glass will often trap medium-sized bubbles. These bubbles aren't large enough to affect the integrity of the art by rising to the surface and becoming thin, but they do visually affect the surface of the glass. I've heard these called "mumps and bumps". If you look across the surface of the glass with a good light, instead of a nice flat surface you will see an irregular surface with small bumps in the glass.
The landscape pictured here is a work-in-progress of a piece with an irregular glass surface caused by an insufficiently slow ramp up to a bubble squeeze. If you look directly at the piece you do not notice the surface irregularities. However, in the second photo below I've angled the camera so that the glare from the light catches the bumps across the surface.
There are (at least!) two ways to help ensure your layers of glass fuse together smoothly. One is by using a bubble squeeze. The idea of a bubble squeeze is that the glass will begin to slump in the middle before the outside edges are sealed. As the top layer of glass begins to flatten against the bottom layer, the air is pushed out toward the edges.
I have read a lot of advice about the firing schedule you should use to accomplish a bubble squeeze. All of them generally recommend holding at a temperature of 1225 to 1250 degrees Fahrenheit for a period of about an hour during the initial ramp up to the process temperature. However, from my experience, it is not merely the long hold that accomplishes the bubble squeeze. It is also a slow ramp up to that holding temperature that helps to gradually relax the glass and move the air to the outside edges.
Currently, I work with 96 COE glass. My firing schedules are generally conservative. From my perspective, I would rather spend a few more hours firing in the kiln than rush the firing and experience failures. Also, I use a Corelite kiln shelf in my largest kiln, and the manufacturer recommends slower ramp rates to avoid thermal shocking the shelf. Consequently, my firing schedules are often something like the following (all temperatures in degrees F)
Then, proceed as usual to your process temperature, appropriate annealing time, and schedule for dropping to room temp.Ramp 1 200 degrees per hour to 1100, hold one hourRamp 2 50 degrees per hour to 1225 - 1250 (depending upon your kiln), hold one hour
The hold at Ramp 1 ensures that all of the glass comes to the same temperature prior to beginning the slow ramp up to the bubble squeeze hold.
With the landscape piece above, I increased my usual 50 degrees ramp to 100 degrees, thinking that this smaller piece would not be affected. Unfortunately, this change in my usual firing schedule adversely affected the fired piece.
I mentioned earlier that there are two ways to help mitigate bubbles in your fused glass. The second way is to use a light dusting of clear powder between layers (see Resources, below). Use these two techniques together (a fine layer of powder plus a conservative bubble squeeze) to help ensure a smooth surface on your fused glass. These combined techniques helped to achieve the lovely surface of the black glass in my sculpture, "Invisibility", shown at the beginning of this article.
I hope this information has been helpful. Happy fusing!
Dana
"At least two ways"?
Other methods used to avoid bubbles include:
- Placing small chips of glass at the corners of the glass, between the two layers (often called chads). I have found that even a small piece of glass can have a negative effect on the fired piece, either because it misshapes the edge or because it can be seen.
- Using clear fine frit instead of powder. This will work, but it may cause more bubbles if not used correctly. Plus, using a very fine layer of power is marginally more economical.
- Most glass has a smoother side and a rougher side. Generally, avoid firing the glass smooth side to smooth side, or rough side to rough side. Both are more prone to trapping bubbles.
Resources
Bullseye Glass Education, Tip Sheet: Powder Power
In the back of almost all of his e-books, Glass Artist/Educator Paul Tarlow includes a method of applying a thin layer of powder to mitigate bubbles. Paul's e-books can be found at https://fusedglassbooks.com/


