Celebrating Spring
 |
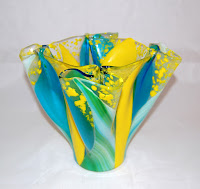
| Finished daffodil vase, 8.5" tall |
When the snow begins to melt and robins begin to chirp, thoughts turn to spring. It's a sure sign that winter is on its way out and the spring daffodils and tulips will soon be bobbing in the breeze. To celebrate the return of spring (and to prepare for an upcoming show), I wanted to create a draped vase in the season's colors. In this post, I thought I would share information about how the vase was created.
Materials
System 96 Glass
- Yellow opal
- Lagoon Opal Art
- Sky blue transparent
- Clear
Papyros shelf paper
Pattern Design
The first step was to create a pattern. I wanted to represent a garden design. I picked out the Lagoon Opal Art glass for the leaves of my design, to take advantage of the nice flow in the glass pattern. This glass has green, yellow, white, and some sky blue colors, so it set the palette for my design.
 |
| Trumpeter vase from Slumpy's |
The trumpeter drape mold has a 3" bottom and is 8.5" tall. I cut a 17" clear circle to use as my base glass. This gave me 3" for the bottom of the vase and the remaining 7" on each side would allow for the glass to stretch when draped.
 |
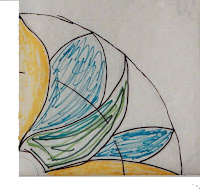
| Fold the paper in quarters to draw part of the design, then trace the remaining sections using a light box. |
For the pattern, I drew a 17" circle on white butcher paper, and then drew an 11" circle within it. This second circle was for reference as I designed my pattern. I then began to draw my design. I wanted the design to be symmetrical, so I folded my paper in quarters, and drew one quarter of the design. Using a light box, I traced my lines to the other three quarters.
 |
| The full pattern, with colors roughly sketched in. |
To get a rough idea of colors, I used some markers to color the sections, and I began cutting glass.
Note that I cut only the glass elements that you see colored in at the right. To fill in the clear border, I used my frit maker to crush clear and yellow glass to a coarse grade. I mixed the two frits together and used them to fill in the clear areas (to the edges) of the vase.
I often use CMC as glue. For this piece, I used a small paint brush to apply the CMC around the edges of the 17" circle before applying the frit. This helps keep the frit in place, up to the very edges of the glass.
The piece was fired using an appropriate schedule for the size and layup of the piece:
Note the slow advance and long hold for a bubble squeeze in segment 2.
I often use CMC as glue. For this piece, I used a small paint brush to apply the CMC around the edges of the 17" circle before applying the frit. This helps keep the frit in place, up to the very edges of the glass.
The piece was fired using an appropriate schedule for the size and layup of the piece:
Seg
|
Rate
|
Target
|
Hold
|
|
1
|
200
|
1100
|
30
|
|
2
|
50
|
1250
|
60
|
|
3
|
300
|
1460
|
15
|
|
4
|
AFAP
|
950
|
120
|
|
5
|
100
|
700
|
00
|
Note the slow advance and long hold for a bubble squeeze in segment 2.
For the drape firing, I sprayed the vase former with ZYP boron nitride (BN), and placed a 3" circle of Papyros paper on the top (base) of the vase. Occasionally, I have seen hazing from BN spray on the bottoms of vases. The Papyros helps prevent that. I placed the vase on kiln dams in the kiln to elevate it, and placed the glass blank on top. I centered the blank carefully to help ensure a uniform drape. The vase was fired using the following schedule:
Seg
|
Rate
|
Target
|
Hold
|
|
1
|
100
|
1100
|
60
|
|
2
|
100
|
1225
|
*
|
|
3
|
AFAP
|
950
|
240
|
|
4
|
100
|
700
|
00
|
*Observe
Note two things about the schedule. First, with all of my firings, I include a long hold (30 to 60 minutes) at 1100 deg F. This accomplishes a few things. First, it allows the glass to equalize in temperature. For drapes and slumps, I also think this gets the glass "moving in the right direction" very slowly and evenly. With many pieces, the glass is close to being fully slumped after a 30 minute hold. For this piece, I continued up to 1225 for the final drape and observed carefully, skipping to the annealing segment when the drape was complete. I haven't provided a time for this hold because all kilns are different, and because I encourage you to look in your kiln (with proper eye protection) and observe how the glass is moving during the firing.
The Finished Vase
 |
| The vase draped almost perfectly symmetrical. |
My husband often gets frustrated with me when I show him a new piece from the kiln and then proceed to tell him all the things wrong with it (as the cliche' goes, we are our worst critic). The kiln was finally cool enough to open right before bedtime. After checking on the vase, I came upstairs and said, "You know that vase?"
"Yeah, oh no, what?" he asked.
"It's perfect."
(I think he almost fell over.)
(I think he almost fell over.)
 |
| The design elements are evently spaced around the vase. |
As you can see from the two photos on the left, the drape was very symmetrical, with four beautiful folds spaced evenly around the rim, and the design elements spaced evenly along the sides.
There are several reasons that led to the success of the drape. I won't go into those here, but if you are curious or want to learn more about draping, I recommend you check out Paul Tarlow's great ebook, "Creative Fused Glass Draping". The book includes 80 pages of how glass behaves in the kiln during a drape, ways to control the folds of a drape, and several project ideas. See the Resources section below for a link to the ebook site.
This piece will be heading to The Pioneer Theatre's Loge Gallery in May, for the Glass Art Guild of Utah's spring show and sale. Until then, I'm enjoying a little glimpse of spring as the vase sits on my dining room table!
This piece will be heading to The Pioneer Theatre's Loge Gallery in May, for the Glass Art Guild of Utah's spring show and sale. Until then, I'm enjoying a little glimpse of spring as the vase sits on my dining room table!
Happy spring,
Dana
Resources
Paul Tarlow, Fused Glass ebooks: http://fusedglassbooks.com/
Slumpy's Molds, https://www.slumpys.com/
I buy all my supplies (glass, molds, Papyros, etc.) from D&L Art Glass https://www.dlartglass.com/
Glass Art Guild of Utah, http://www.glassartguild.org/
Glass Art Guild of Utah, http://www.glassartguild.org/
For more information about fusing, click the banner below and check out Bullseye Glass's educational video series!


