Fused Glass Koi Platter
 |
| Close-up of painted koi |
The koi texture tile is 13x7". I often cut the glass for this size of tile ~6 x 12", so that I don't have to worry about the glass migrating over the edges (which will break the glass and potentially damage the tile). That's really not a concern with this piece, but it can be a concern if you add a lot of frit or larger pieces of glass that increase the overall volume of the glass.
 |
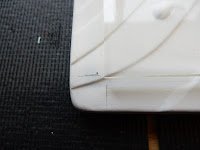
| Lightly penciled registration marks. |
Painting
For this piece I wanted all of my color to come from the UGC paints, so I used clear glass for both the top and bottom layers. I placed my glass pieces, one at a time, on top of the texture tile and used the tile as a guide for where to apply the paint. Note: I use System 96 glass.With a pencil, I put registration marks on the tile so when I removed the glass I could replace it back in the correct spot.
 |
| Water background. Bottom layer of glass. |
For the water background, I applied Unique Glass Colors NT paints and Artisan paints on the bottom layer of glass. The Artisan paints produce lovely bubbles when fired between two layers of glass.
 |
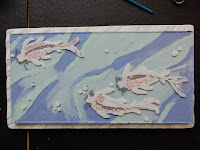
| Koi fish. Top layer of glass. |
The koi fish were painted on the top layer of glass. The white paint is an NT called White Diamond, which when fired, produces a lovely white shimmer.
After painting the fish on the top side, I filled in some bare spots on the back side with the White Diamond.
 |
| Glass pieces placed on texture tile. |
Once the paint was dry, I placed the two pieces of glass on top of the texture tile, using the registration marks as a guide.
Firing
Many people prefuse the layers and then fire the resulting piece a second time on the texture tile. I always fuse my layers of glass directly on the texture tile. Below is the schedule I used. Note the slow ramp in Segment two, up to 1250 deg F with a 60 minute hold. This is the bubble squeeze. If I were firing this piece by itself, I might consider omitting this segment since I was using bubble paints and, well, bubbles were desirable in this piece! |
| In the kiln, ready to fire. |
|
Seg
|
Rate
|
Target
|
Soak
|
|
1
|
300
|
1100
|
30
|
|
2
|
50
|
1250
|
60
|
|
3
|
500
|
1460
|
15
|
|
4
|
1500
|
950
|
90
|
|
5
|
100
|
700
|
00
|
After the first firing, I slumped the piece in an 11.5 inch Origami Bowl Mold from Slumpys (I no longer see this particular mold on their site, but here is a link to the mold on Amazon).
 |
| Origami Bowl Mold for slump. |
Note that this is a square mold, but I'm firing a rectangle. I centered the glass within the mold and fired away! Here is the firing schedule for the slump:
 |
| Ready to slump. The rectangular koi platter was centered on top of the square mold and fired. |
|
Seg
|
Rate
|
Target
|
Soak
|
|
1
|
200
|
1100
|
40
|
|
2
|
300
|
1225
|
10
|
|
3
|
1500
|
950
|
120
|
|
4
|
100
|
700
|
00
|
 |
| Finished koi platter. |
 |
| The platter sits nicely on the table. No cold working needed! |
And finally, here are some pictures of the finished piece. The origami mold worked out well with the koi design.
This platter sold at the art fair I attended a few weeks later.
I hope this short tutorial has been useful, and helps you with your work with texture tiles and paints. Don't forget to visit the Creative Paradise web site for this and many other texture tiles, and the UGC web site for your paints!
Happy fusing, Dana
 |
| Close-up of the painted koi and water. Bubbles and sparkle! |
Resources:
Creative Paradise's web site for texture tiles and other molds: http://www.creativeparadiseglass.com/
Unique Glass Color Paints: http://uniqueglasscolors.com/
Want to learn more about fusing? Visit Bullseye Glass's site for Educational Videos! (available for a small subscription fee). Click on the banner to learn more:


