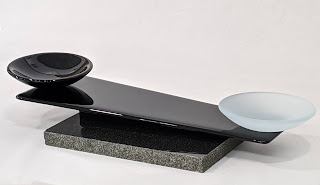
Yellowstone Inspired Fused Glass Serving Tray
 |
| Yellowstone Inspired Fused Glass Serving Tray |
One of the things I appreciate about living in Northern Utah is our proximity to several national parks. Utah is home to The Mighty Five – Zion, Arches, Canyonland, Bryce, and Capitol Reef National Parks. A stone’s throw from Utah’s borders are Great Basin, Mesa Verde, and Grand Canyon. Out of all the parks in our area, the two that I’ve visited the most are Grand Teton and Yellowstone National Parks.
Most often when I visit, I am in the
company of loved ones. Both are destinations on many people’s bucket list, so
we travel there with out-of-town guests. Because they are close, the parks are also destinations for long adventure weekends. I’ve carried my gear over a 10,700-foot
pass in the Grand Tetons while backpacking with friends; participated with all
the other gawkers in bear, bison, and wolf jams; and seen tears well up in
someone’s eyes the first time she experienced the expansive vistas.
The memories I have shared with friends and family have made the parks special places for me. It’s no surprise then, that some of my art is inspired by these visits. In this tutorial, I share how I created one of my Yellowstone-inspired serving platters.
The memories I have shared with friends and family have made the parks special places for me. It’s no surprise then, that some of my art is inspired by these visits. In this tutorial, I share how I created one of my Yellowstone-inspired serving platters.
Materials
All the glass I used in this project is 3 mm System 96
glass. Rather than list specific product numbers, I have listed colors. This allows
you artistic license to match your creativity, as well as your glass supplies
on hand.
- Clear glass cut to 14.5”x8.75”
- Blue glass, ~4”x8.75”
- White and clear patterned glass, ~8.75”x10.75” (I’ve used Spirit glass; wispy would also work well.)
- Green glass, ~4”x8.75”
- Bright blue glass (turquoise also works well), ~6”x12”
- Medium amber frit
- Coarse cherry red frit
- Fine black aventurine frit
- Papyros paper for first firing
- Bullseye BE 8947 serving tray mold (kiln-washed)
The Pattern
 |
| West Thumb, Yellowstone NP photo: Dana Worley |
The West Thumb area in Yellowstone was my inspiration for
this piece. The deep blue pools are surrounded by a white crust and are set
against a backdrop of trees with Yellowstone Lake in the distance. The Bullseye
serving tray mold is a nice mold for this project. If measured carefully, the
round indention of the serving tray can be used for the pool, and the upper
part of the mold provides a nice area for the trees and sky.
I’ve included a pattern here, but you can also draw your
own. The important measurements are to draw a 5” circle for the pool that is 8”
from the top edge of the tray and centered (thus, each side edge of the circle is
about 2” from the side edges of the pattern).
Cutting the Glass
When cutting the glass, I used the pattern as a guide, but I
didn’t stick to it strictly. It’s more important that adjacent glass pieces
match up with each other, so I used previous cuts to determine how the next
piece was cut. After cutting the first piece, I determined the cutting lines
for the next piece by laying the glass on top of the pattern and the adjacent
cut piece and drawing the cutting line.
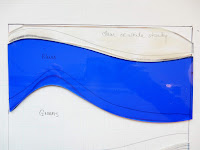 |
| Blue and white glass for sky and clouds |
First, using the blue glass, cut the piece for the sky.
Next, using some of the patterned white and clear glass, cut the piece above
the blue sky. Note that this white and clear glass does not completely follow
the square edge of the rectangle (it’s rounded a bit at the edges). This was to
encourage an organic edge at the top to match the style of the piece.
 |
| Use the pattern to draw cutting lines for the pool |
Now, using the lighter blue or turquoise glass, cut an organic
shape for the pool. I used the circle I had drawn on the pattern as a guide for
the size, but I didn’t cut out a round circle (see image at left).
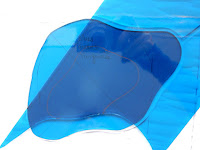 |
| Cut a smaller shape to add depth to the pool |
To add depth to the center of
the pool, cut a smaller organic shape that will be placed on top of the larger shape
when fired. These two stacked layers will result in a deeper color in the shape
of the smaller pool.
 |
| Use the larger blue pool to draw a cut-out on the white glass. |
To cut the bottom white portion for the ground, I started by cutting out the full piece, including the area that would eventually be cut away to surround the pool. This is not the most efficient use of glass, but it allows for continuity in the pattern. You can choose to cut smaller pieces, not worrying about glass pattern continuity, to save on glass.
Working on top of the pattern as a guide, place the larger
blue pool on top of the white glass. Use a Sharpie to mark its shape on the white glass.
 |
| Cut the white glass in half, diagonally |
Now, cut the
white glass in half, so that the pool shape can be cut out. I’ve tried to find
a natural break line from one edge to the other, which will not be noticeable
in the final firing (refer to drawing).
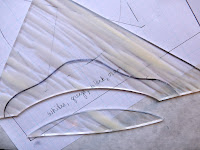 |
| Intermediate cut so that the inside cut breaks out successfully |
To cut out the area surrounding the pool, you will likely need to make
intermediate cuts as shown in the picture. (Note that you could also make quick
work of this cutting business with a ring saw!)
 |
| Place the green glass on the pattern and draw cutting lines |
Now, cut the green glass for the trees, again, following the
pattern and the existing cut glass pieces. Using scraps of green glass, cut a
few slender triangles and place them on top of the green, to give the
impression of closer trees. Note that stacking the triangles will result in
more saturation of color (just like the pools), and darker trees. I also chose
to use a few triangles of lighter green for some of the trees.
 |
| Cut glass placed on pattern |
The cutting is complete and now it is time for the final
touches. Lay out all the cut pieces of glass on the pattern.
 |
| The piece with the frit added |
Using the amber
medium frit, fill in the space between the green trees and the white ground
(marked Gold on the pattern). Next, use more amber frit, cherry red frit, and
the black aventurine frit to add the colorful crust around the pool (these
colors are produced by bacteria, but they certainly make a dramatic
landscape!). The frit will help to conceal the cut lines you made in the white
glass to accommodate the pool. Scraps from the white and clear glass can be used to add clouds to the blue sky. I also used a light sprinkle of some of the
black aventurine frit in the tree area to add interest.
 |
| Do a final check of the piece on a light table, if available |
I checked the final layout of my work on a light table. Notice how the smaller pool placed on top of the larger one saturates the color and adds depth to the pool. The triangle shapes for the trees produce this effect as well.
I used the following schedule for the first fuse. Note that
even though I have varying volumes of glass, I did not dam the piece. Again, I
was looking for a more organic edge to match the composition.
Segment
|
Rate
|
Target Temp
(deg F)
|
Hold
(minutes)
|
1
|
300
|
1100
|
30
|
2
|
50
|
1250
|
60
|
3
|
300
|
1460
|
15
|
4
|
AFAP
|
950
|
120
|
5
|
100
|
700
|
00
|
My schedule for the slump was as follows (note: Bullseye recommends a longer hold at 1225, but does not include the 30 minute soak at 1100 deg F. This schedule works for me, in my kiln. You may need to adjust for your kiln. See resource links below for BE's suggested slump schedules for molds):
Segment
|
Rate
|
Target Temp
(deg F)
|
Hold
(minutes)
|
1
|
250
|
1100
|
30
|
2
|
300
|
1225
|
30
|
3
|
AFAP
|
950
|
120
|
4
|
100
|
700
|
00
|
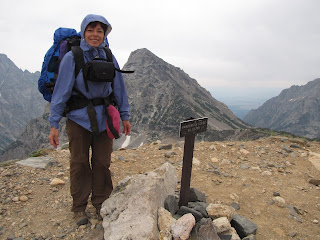 |
| Memories! At the top of Paintbrush Pass, Grand Teton National Park (2013) |
Dana
Resources:
Bullseye Glass Quick Tips Suggested Slumping Schedule


