Green Man Mosaic
 |
| Green Man, Fused Glass Mosaic |
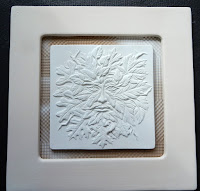
I have several texture molds, including a "Green Man" from Creative Paradise. I love the look of this woodland fellow peeking out from behind glass. I wanted to create a special piece using this texture tile. So that it would be different and unique, I decided to create a fused glass mosaic. Following is a short tutorial on how this piece was created.
Materials
(1) 11x11" clear glass
(24) 1.25" squares of colored glass (I've used Fusers Reserve)
(1) 6.5" square bronze irid
(16) 1/2x1" rectangles of vanilla cream
(4) 1/2" squares vanilla cream
Water clear fine frit
Darker fine frit (I used dark green opal and bronze)
Zyp boron nitride spray
Hair spray
Klyr-Fire
1/8" strips fiber paper
High temp wire
White glue
(4) Bump-ons
Picture wire or fishing line for hanging
7" Green Man tile from Creative Paradise
12" square drop out mold
Directions
The idea was to use the 7" texture tile and the drop out mold together to form the final mold for the fused piece. At left is what I had in mind.
Prepare the texture tile using Zyp spray. With a texture mold like this, I usually spray lightly from top to bottom, rotate the piece a quarter turn and spray again, rotate and spray two more times so that I have sprayed a light coating from all four directions.
The drop out mold can be kiln-washed or sprayed with Zyp (I used kiln wash.
Put the 11" clear glass on a work surface, and begin laying out the 1.25" squares of Fusers Reserve around the outside perimeter. (You'll notice that I used the drop out mold to work on.) When doing mosaics, I like to secure each tile with a drop of hair spray (I keep hair spray in a small bottle with an eye dropper).
Once the 1.25" squares are in place, center the piece of bronze irid in the middle. I set the glass irid side up; however, you could also place it irid side down for a more subtle irid effect.
Next, place one of the four 1/2" squares in each of the four corners between the outside tiles and the larger center piece, and then evenly space the vanilla cream rectangles.
(Note, you could get crazy with this and measure the placement of every tile. However, I just "winged" it! Working on top of the drop-out mold helped with placement.)
 Once all the tiles are in place, begin filling the gaps with the water clear fine frit. I use a frit scoop. Notice that I've used a narrow strip of glass set on edge and held in place with a piece of broken kiln shelf to keep the frit from falling off the edges. Fill the gaps along one edge at a time, use a dry paint brush to brush frit from the glass tiles, and then put a generous drop of Klyr-Fire at the end (outside edge) of each filled gap to hold the frit in place. When you've finished an edge, move the long glass dam strip to the next edge and continue.
When all edges are filled in, fill in the remaining gaps in the center. Carefully brush away loose frit from the top of all glass, especially the irid (since clear on top of the irid will change the appearance of the glass).
Tip: Try not to get the dry brush into the Klyr-Fire saturated frit!
Fire this piece on a prepared kiln shelf (either kiln-washed or covered with Papyrus -- I like the Papyrus). Following is the schedule I used in my kiln. The schedule may need to be adjusted for your kiln.
Seg
|
Rate
|
Target
|
Soak
|
Est. Seg. Time
|
|
1
|
300
|
1100
|
30
|
3:57
|
|
2
|
300
|
1350
|
20
|
1:10
|
|
3
|
1500
|
950
|
120
|
3:00
|
|
4
|
100
|
700
|
00
|
2:30
|
Next, use the colored frit to add some shading to the texture mold. I wanted to only add shadows, not really any color, so I choose a dark green opal and a bronze transparent.
The frit scoop helps with the placement of the color. Use a dry brush to carefully brush the frit into the recesses of the tile. Be careful not to disturb the Zyp coating.
Place the texture tile and the drop-out ring in the kiln, directly on a kiln shelf. Place 1" strips of 1/8" fiber paper along the edges to basically fill in the gap between the texture tile and the drop-out ring. The strips are just laid loosely on top. I did this to prevent the glass from slumping too far over the sides of the texture tile, which would likely cause the glass to crack when it cooled.
Use the high-temp wire to create two loops for hanging. On the back of the pre-fired piece, use white glue to glue two squares of 1/8" fiber paper where you want to place the hangers. Place the wire loops on top of the fiber paper, allowing the "tails" of the wire to touch the glass below. Then place a strip of clear glass over each tail. Scotch tape in place.
Place the pre-fired glass, right-side up, on top of molds and fire.
The following schedule worked in my kiln. You may need to adjust it for your kiln.
Note that I used a conservative ramp, as well as a long annealing schedule. The long anneal was for several reasons, including the potential for heat differences because of the two molds, the gap covered with fiber paper, and the hanging wires in the glass.

Seg
|
Rate
|
Target
|
Soak
|
Est. Seg. Time
|
|
1
|
200
|
1100
|
30
|
5:40
|
|
2
|
200
|
1450
|
10
|
1:55
|
|
3
|
1500
|
950
|
120
|
2:50
|
|
4
|
100
|
700
|
00
|
2:30
|
As with every piece, there are always things I would try differently the next time around. One of those is attempting this all in one firing, so that I better retain the original contour fuse of the mosaic tiles. However, since this was the first time around I decided to play it safe and do two firings. I was concerned that the tiles might move before fusing, when the base glass started to move.
This lovely Green Man Mosaic will eventually hang outdoors, so I strung fairly heavy-duty picture framing wire between the two embedded wire loops. I also placed "bump-ons" at each of the four corners of the bronze glass. If hanging in-doors you could use heavy-duty fishing line or a decorative chain. Overall, I'm happy with the piece and look forward to seeing it in it's new home!
I hope you've found this tutorial useful, and that it will inspire you to do something unique with your texture tiles!
Dana
Resources
Green Man tile, GX12, by Creative Paradise http://www.creativeparadiseglass.com/
Want to learn more about fusing? Check out Bullseye's On-Line Educational Videos! Click the banner below.


