We Broke the Mold on this One!
A few weeks ago, I purchased a new vase slumping form from Delphi Glass. This particular mold was ceramic, and I was a bit nervous going against the adage of "slump into ceramic and over stainless". But hey, they were selling it. And surely they wouldn't sell me something that wouldn't work! So I decided to give it a go.
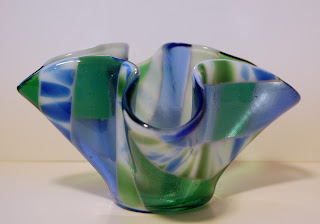
After planning out a pattern on paper, I cut a clear circle that was 8.5 inches in diameter. I then cut strips of medium blue cathedral, medium green cathedral, and a nice white/blue/green Spirit glass. The green and blue strips were approximately 1.25 inches wide and the Spirit glass strips were 0.75 inches wide. I ground the outside edges to insure a nice even edge. I then arranged the strips on top of the clear glass and put them into my Paragon 14 kiln.
I followed a fairly standard fusing schedule of:
The result was a good full fuse with smooth edges.
At this point the piece was already a nice shiny object (my weakness), and it could have been used for a cheese platter I suppose, but it was time to take the plunge. The next step was to slump the disk over the kiln-washed ceramic mold. Into to the kiln it went!
The slumping schedule was similar to the schedule above, except my top temperature was 1250 rather than 1450.
Now the problem with slumping over ceramic molds is that glass and ceramic have different expansion coefficients. The end result is that when they cool down, the glass will contract more than the ceramic. The danger is that the glass will contract so tightly around the ceramic mold that the glass will break. I had been told that if the piece was carefully watched during the slumping phase, I could avoid problems with the glass breaking or being trapped in the mold by stopping the slump just before it draped enough to touch the sides.
Gravity and physics had other plans in mind, however. I suspect that because of the design and those nice straight lines I had (perfect bending points), two opposing sides slumped first (the left and right sides in the photo above). In fact, they slumped much more quickly that the other two sides. Since I was not going for the taco look, I did not stop the slumping process until the remaining two sides had draped.
I held my breathe and waited to see what happened. When I removed the vase from the kiln, the glass was still intact (whew!), but it was firmly surrounding the mold.
Uh, oh.
I headed to google, the oracle of all modern wisdom, looking for a solution to safely separate the two pieces. I tried soaking in water -- for two days! -- to no avail. I tried using fishing line as "floss" hoping I could remove enough of the kiln wash to give it just a little leeway to slip out. I also read advice ranging from dropping the piece from a table to the floor to jar it loose, whacking it with a hammer, or hanging it upside down and reheating it in the kiln hot enough to let the glass contract so the mold would fall out. I just wasn't brave enough to try any of this latter advice. I really wanted to save the vase if possible.
 My final plan of attack was to use a Dremel with a cutting disk, to cut away just enough of the mold to free the glass. It sounded easy enough; unfortunately, that plan failed. But in the end, I decided that there was no obstacle that a hammer and screwdriver could not remove from my path.
I can safely say that this is a one of a kind piece. I broke the mold on this one -- literally!
With every creation, I think an artist learns something. This lesson in glass is not one I will forget, and I'll certainly be heeding the common wisdom the next time I decide to slump a piece of glass.
So for now, lesson learned. I'm off to look for stainless steel molds.
Dana (aka, The Jester)
After planning out a pattern on paper, I cut a clear circle that was 8.5 inches in diameter. I then cut strips of medium blue cathedral, medium green cathedral, and a nice white/blue/green Spirit glass. The green and blue strips were approximately 1.25 inches wide and the Spirit glass strips were 0.75 inches wide. I ground the outside edges to insure a nice even edge. I then arranged the strips on top of the clear glass and put them into my Paragon 14 kiln.
I followed a fairly standard fusing schedule of:
- 500 > 1000 hold 10
- 250 > 1450 hold 25
- afap > 1100 hold 5
- 500 > 960 hold 45
- 300 to room temp
The result was a good full fuse with smooth edges.
At this point the piece was already a nice shiny object (my weakness), and it could have been used for a cheese platter I suppose, but it was time to take the plunge. The next step was to slump the disk over the kiln-washed ceramic mold. Into to the kiln it went!
The slumping schedule was similar to the schedule above, except my top temperature was 1250 rather than 1450.
Now the problem with slumping over ceramic molds is that glass and ceramic have different expansion coefficients. The end result is that when they cool down, the glass will contract more than the ceramic. The danger is that the glass will contract so tightly around the ceramic mold that the glass will break. I had been told that if the piece was carefully watched during the slumping phase, I could avoid problems with the glass breaking or being trapped in the mold by stopping the slump just before it draped enough to touch the sides.
Gravity and physics had other plans in mind, however. I suspect that because of the design and those nice straight lines I had (perfect bending points), two opposing sides slumped first (the left and right sides in the photo above). In fact, they slumped much more quickly that the other two sides. Since I was not going for the taco look, I did not stop the slumping process until the remaining two sides had draped.
I held my breathe and waited to see what happened. When I removed the vase from the kiln, the glass was still intact (whew!), but it was firmly surrounding the mold.
Uh, oh.
I headed to google, the oracle of all modern wisdom, looking for a solution to safely separate the two pieces. I tried soaking in water -- for two days! -- to no avail. I tried using fishing line as "floss" hoping I could remove enough of the kiln wash to give it just a little leeway to slip out. I also read advice ranging from dropping the piece from a table to the floor to jar it loose, whacking it with a hammer, or hanging it upside down and reheating it in the kiln hot enough to let the glass contract so the mold would fall out. I just wasn't brave enough to try any of this latter advice. I really wanted to save the vase if possible.
 My final plan of attack was to use a Dremel with a cutting disk, to cut away just enough of the mold to free the glass. It sounded easy enough; unfortunately, that plan failed. But in the end, I decided that there was no obstacle that a hammer and screwdriver could not remove from my path.
I can safely say that this is a one of a kind piece. I broke the mold on this one -- literally!
With every creation, I think an artist learns something. This lesson in glass is not one I will forget, and I'll certainly be heeding the common wisdom the next time I decide to slump a piece of glass.
So for now, lesson learned. I'm off to look for stainless steel molds.
Dana (aka, The Jester)


