Getting back into the Groove
It was a busy holiday season at both work and play. I enjoyed parties with friends and family, and many cross-country ski outings despite the fact we're experiencing a lighter than usual snow year. But it's time get get back in the basement, dig out the glass and oil cutter, and begin work on some new glass treasures.
One of the nice things I received during the holidays was a gift certificate to Delphi Glass. I had been wanting more slumping molds so this was the perfect gift. I picked up molds for a bowl, a vase, a triangular-shaped dish, a fluted sushi/soap plate, a drop ring, and some additional kiln posts. I'm excited to get started with these. In fact, I applied kiln wash this morning and the molds are in front of the fireplace drying as I type.
Another thing I had been interested in trying were gold decals for firing on the surface of glass. If you are a glass fuser and haven't tried these, I'll share some of my thoughts here. The instructions that came with the decals were rather vague so perhaps some of my comments will help.
Since this was my first experience with decals, I thought I would pick up the sampler pack. The description read there were approximately 40 decals per sheet. I got weird and counted mine and, if you count each dragonfly individually, there are 54 pieces.
The instructions said to cut the decals to size and soak in warm water "until they slide off easily". They also cautioned about soaking too long. I wasn't certain if "easily" equated to 15 minutes or 5 seconds. Ultimately, it was closer to the 5 second range. A short float was all that was required. The first decal went floating away in the water when I did a test to see if it was ready. Despite what the instructions said, I was able to retrieve the decal by hand. No need for the tweezers they suggested!
I chose seven previously fired cabs to apply the decals to. The whole process went quicker and was much less complicated than I anticipated. Perhaps I am just intimated by new experiences :). I placed all the decals on the cabs and let them dry overnight as suggested.
Another vague area was the information on firing. The instructions read to heat the kiln "slowly". Again, I was a bit uncertain what "slowly" meant. I figured 1000 degrees per hour was slow enough for me (I'm impatient, after all), so I set the kiln to ramp up to 1000 at 1000/hour, hold for one minute, and then ramp AFAP to 1275 (the instructions recommended 1250-1425). I used a 10 minute hold at 1275, turned the kiln off, and flash cooled to 950. I then left the kiln to cool on its own for the next few hours.
One note here: The instructions recommended keeping the kiln lid open so that the burn-off from the decals would not contaminate the finished product. I did not do this. I left the vent out of the kiln and called it good.
The results were lovely :)
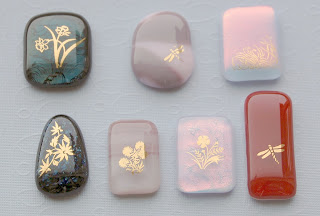
I used a combination of lighter- and darker-colored cabs. When I was placing the decals, the gold showed up well on the lighter cabs. On the darker cabs, it really didn't show up at all. It was hard to determine placement on these darker colors, especially on the dark blue aventurine (lower left) and the iridescent black crackle (upper left). When the pieces were fired, however, the results were just the opposite. The gold shows up clearly on the darker cabs, and is much more subtle on lighter ones. I guess that's a Duh moment for me ;) In the future, I'll stick with the darker glass colors for decals.
I'll finish these off with some nice gold bails. The red dragonfly is just begging for a drilled gold-toned lattice bail (the ones I have in stock at the moment came from Kaiser Glass). It's also begging for me to keep it :) Look for these items to appear in my on-line store soon!
Until next time, Dana (aka, The Jester)


